
Integrating MAUI Client via using OpenID Connect
This is a demonstration for connecting ABP backend from MAUI app via using openid connect.
In this flow, a web browser will be opened when user tries to log in and user will perform login operation in the browser. Then IdentityServer will redirect user to application with login credentials (state, token etc.) will be handled by application.
This is by intent. The code flow does not allow the user to log in using a native view in the app. The reason being that this flow ensures that the username and password are never seen by the client (except the browser, which is part of the OS system - aka we trust it). You could enable using a native login view with the Resource Owner Password Credentials (ROPC) flow. But this is also an attack vector. Suppose someone makes a fraud duplicate of your application and tricking users into entering their credentials. The fraudulent app could store those credentials in-between. You just got to enjoy those tin-foil-hat moments when doing security. In other words, using the code flow does not give an attacker that opportunity and therefore is the recommended option for mobile clients.
By the way, my motivation for building this sample is presenting just another way for authentication. Resource Owner Password Credentials authentication is already provided and it's more common way to do. This is yet another way to authenticate users.
Source Code
You can also find source code on GitHub in ABP-Samples.
Creating projects
- Create an ABP project without UI
abp new Acme.BookStore -t app --no-ui -d mongodb --no-random-ports
- Create a maui application
mkdir maui
cd maui
dotnet new maui -n Acme.BookStore.MauiClient
There is a long way for configuring scopes and callback urls for both server and clients. We'll use WebAuthenticator to perform this operation.
Configuring IdentityServer
- Go to DbMigrator folder and MAUI client in appsettings.json. Add following client code in IdentityServer:Clients path:
    "BookStore_Maui": {
        "ClientId": "BookStore_Maui",
        "ClientSecret": "1q2w3e*",
        "RootUrl": "bookstore://"
    }
- Go to IdentityServerDataSeedContributor in Domain project under IdentityServer folder. Append following code section into CreateClientsAsync() method.
// Maui Client
var mauiClientId = configurationSection["BookStore_Maui:ClientId"];
if (!mauiClientId.IsNullOrWhiteSpace())
{
    var mauiRootUrl = configurationSection["BookStore_Maui:RootUrl"];

    await CreateClientAsync(
        name: mauiClientId,
        scopes: commonScopes,
        grantTypes: new[] { "authorization_code" },
        secret: configurationSection["BookStore_Maui:ClientSecret"]?.Sha256(),
        requireClientSecret: false,
        redirectUri: $"{mauiRootUrl}"
    );
}
Run DbMigrator
Then run HttpApi.Host
Configuring NGROK
Client will check configuration from /.well-known/openid-configuration path and it must be a secured connection between client & server. I prefer to use ngrok to open my backend app to entire web.
Go to getting started page of ngrok (login or register first) and download the ngrok tool.
Don't forget to login from tool:
ngrok authtoken XXXA sample command is being displayed at dashboard where you download ngrok from
Open your HttpApi.Host with ngrok
.\ngrok.exe http https://localhost:44350You'll see a generated xxx.ngrok.io url. Navigate to
/.well-known/openid-configurationto check if it's working right.You should see something like that:

Issuer must be your URL, not localhost! If you see still localhost, try to disable host header rewrite.Also, ValidIssuers must be defined to validate tokens.
Add ValidIssuers section to your
appsettings.jsonof HttpApi.Host"AuthServer": { "Authority": "https://localhost:44350", "RequireHttpsMetadata": "false", "SwaggerClientId": "BookStore_Swagger", "SwaggerClientSecret": "1q2w3e*", "ValidIssuers": [ "https://46fd-45-156-29-175.ngrok.io" ] },Then define it in ConfigureAuthentication method in Module class
private void ConfigureAuthentication(ServiceConfigurationContext context, IConfiguration configuration)
{
    context.Services.AddAuthentication()
        .AddJwtBearer(options =>
        {
            // ...
            options.TokenValidationParameters.ValidIssuers = configuration.GetSection("AuthServer:ValidIssuers").Get<string[]>();
        });
}
We're done with backend. Let's continue with MAUI app.
Developing MAUI App
Before we go, there is something to do like configuring dependency injection to get rid of unnecessary huge class coupling.
Configuring Dependency Injection
Go to MauiApplication class and add
MainPagein services.public static MauiApp CreateMauiApp() { var builder = MauiApp.CreateBuilder(); builder .UseMauiApp<App>() .ConfigureFonts(fonts => { fonts.AddFont("OpenSans-Regular.ttf", "OpenSansRegular"); }); builder.Services.AddTransient<MainPage>(); return builder.Build(); }And inject MainPage from constructor in App.xaml.cs
public App(MainPage mainPage)
{
    InitializeComponent();

    MainPage = mainPage;
}
Now MainPage is ready for injecting dependencies to it.
Configuring OIDC
Add
IdentityModel.OidcClientpackage to project<ItemGroup> <PackageReference Include="IdentityModel.OidcClient" Version="5.0.0" /> </ItemGroup>Create WebAuthenticatorBrowser
internal class WebAuthenticatorBrowser : IBrowser
{
    public async Task<BrowserResult> InvokeAsync(BrowserOptions options, CancellationToken cancellationToken = default)
    {
        try
        {
            WebAuthenticatorResult authResult =
                await WebAuthenticator.AuthenticateAsync(new Uri(options.StartUrl), new Uri(options.EndUrl));
            var authorizeResponse = ToRawIdentityUrl(options.EndUrl, authResult);

            return new BrowserResult
            {
                Response = authorizeResponse
            };
        }
        catch (Exception ex)
        {
            Debug.WriteLine(ex);
            return new BrowserResult()
            {
                ResultType = BrowserResultType.UnknownError,
                Error = ex.ToString()
            };
        }
    }

    public string ToRawIdentityUrl(string redirectUrl, WebAuthenticatorResult result)
    {
        IEnumerable<string> parameters = result.Properties.Select(pair => $"{pair.Key}={pair.Value}");
        var values = string.Join("&", parameters);

        return $"{redirectUrl}#{values}";
    }
}
Configure OidcClient in MauiProgram
builder.Services.AddTransient<WebAuthenticatorBrowser>();

builder.Services.AddTransient<OidcClient>(sp =>
    new OidcClient(new OidcClientOptions
    {
        // Use your own ngrok url:
        Authority = "https://46fd-45-156-29-175.ngrok.io",
        ClientId = "BookStore_Maui",
        RedirectUri = "bookstore://",
        Scope = "openid email profile role BookStore",
        ClientSecret = "1q2w3E*",
        Browser = sp.GetRequiredService<WebAuthenticatorBrowser>(),
    })
);
Go to MainPage.xaml, remove everyting and add a button for login
<ContentPage xmlns="http://schemas.microsoft.com/dotnet/2021/maui"
            xmlns:x="http://schemas.microsoft.com/winfx/2009/xaml"
            x:Class="MauiApp1.MainPage">

    <ScrollView>
        <Grid RowSpacing="25" RowDefinitions="Auto,Auto,Auto,Auto,*"
            Padding="{OnPlatform iOS='30,60,30,30', Default='30'}">

            <Button Text="Click to Log In" Clicked="OnLoginClicked" VerticalOptions="CenterAndExpand" HorizontalOptions="Center"/>

        </Grid>
    </ScrollView>
</ContentPage>
Inject OidcClient in MainPage.xaml.cs and make login operation.
using IdentityModel.OidcClient;

namespace Acme.BookStore.MauiClient;

public partial class MainPage : ContentPage
{
    protected OidcClient OidcClient { get; }

    public MainPage(OidcClient oidcClient)
    {
        InitializeComponent();
        OidcClient = oidcClient;
    }

    private async void OnLoginClicked(object sender, EventArgs e)
    {
        try
        {
            var loginResult = await OidcClient.LoginAsync(new LoginRequest());
            await DisplayAlert("Login Result", "Access Token is:\n\n" + loginResult.AccessToken, "Close");

        }
        catch (Exception ex)
        {
            await DisplayAlert("Error", ex.ToString(), "ok");
        }
    }
}
It still won't work because there is something more to do for each platform. Check out the next step and configure the platforms that you're using.
Platform Specific Configurations
Each platform (UWP, OSX, iOS and Android) requires some configuration to use authentication from browser. In that step, we'll open a browser and user will login on the browser. After that, as you see in IdentityServer configurations, IdentityServer will redirect 'bookstore://' url that only contains scheme and that scheme is not http. Our application will handle that scheme and will be launched with parameters.
Android
Start with creating a new Activity named BookStoreWebAuthenticatorCallbackActivity
using Android.App;
using Android.Content;
using Android.Content.PM;

namespace Acme.BookStore.MauiClient.Platforms.Android;

[Activity(NoHistory = true, LaunchMode = LaunchMode.SingleTop)]
[IntentFilter(new[] { Intent.ActionView },
    Categories = new[] { Intent.CategoryDefault, Intent.CategoryBrowsable },
    DataScheme = CALLBACK_SCHEME)]
public class BookStoreWebAuthenticatorCallbackActivity : Microsoft.Maui.Essentials.WebAuthenticatorCallbackActivity
{
    const string CALLBACK_SCHEME = "bookstore";
}
Add
CustomTabsServiceto AndroidManifest.xml as below. (queries tags only.)<?xml version="1.0" encoding="utf-8"?> <manifest xmlns:android="http://schemas.android.com/apk/res/android"> <uses-sdk android:minSdkVersion="21" android:targetSdkVersion="30" /> <application android:allowBackup="true" android:icon="@mipmap/appicon" android:roundIcon="@mipmap/appicon_round" android:supportsRtl="true"></application> <uses-permission android:name="android.permission.ACCESS_NETWORK_STATE" /> <queries> <intent> <action android:name="android.support.customtabs.action.CustomTabsService" /> </intent> </queries> </manifest>For some reason, an error occurs with my emulator while targeting SDK 31, so I've changed the target SDK to 30.
Run the Application and perform a login operation.
AccessToken will be retrieved.
iOS/MacCatalyst
Add following key to Info.plist
<key>CFBundleURLTypes</key>
<array>
    <dict>
        <key>CFBundleURLName</key>
        <string>mauiessentials</string>
        <key>CFBundleURLSchemes</key>
        <array>
            <string>bookstore</string>
        </array>
        <key>CFBundleTypeRole</key>
        <string>Editor</string>
    </dict>
</array>
Open AppDelegate class and override
OpenUrlandContinueUserActivitymethodspublic override bool OpenUrl(UIApplication app, NSUrl url, NSDictionary options) { if (Microsoft.Maui.Essentials.Platform.OpenUrl(app, url, options)) return true; return base.OpenUrl(app, url, options); } public override bool ContinueUserActivity(UIApplication application, NSUserActivity userActivity, UIApplicationRestorationHandler completionHandler) { if (Microsoft.Maui.Platform.ContinueUserActivity(application, userActivity, completionHandler)) return true; return base.ContinueUserActivity(application, userActivity, completionHandler); }Make all steps for MacCatalyst, too.
Tip: If your IDE struggles while displaying references and namespace suggestions, make sure you're displaying that file with iOS Target Framework.
You'll find it at the top of the editor.
UWP (Windows)
Add following protocol extension in
Package.appxmanifestfile.<Applications> <Application Id="App" Executable="$targetnametoken$.exe" EntryPoint="$targetentrypoint$"> <Extensions> <uap:Extension Category="windows.protocol"> <uap:Protocol Name="bookstore"> <uap:DisplayName>BookStore</uap:DisplayName> </uap:Protocol> </uap:Extension> </Extensions> </Application> </Applications>Currently UWP has a bug in MAUI Essentials, I believe the MAUI team will solve it as soon as possible. You can track the status of issue:
https://github.com/dotnet/maui/issues/2702That's it on Windows side. Run the application.
Refreshing the access token
IdentityServer doesn't return a refresh token by default. So we have to add offline_access to our scope while sending login request.
Add
offline_accessto scope in MauiApplication.cs that we configured before.builder.Services.AddTransient<OidcClient>(sp => new OidcClient(new OidcClientOptions { // Use your own ngrok url: Authority = "https://46fd-45-156-29-175.ngrok.io", ClientId = "BookStore_Maui", RedirectUri = "bookstore://", Scope = "openid email profile role BookStore offline_access", // <-- Final state must be like this. ClientSecret = "1q2w3E*", Browser = sp.GetRequiredService<WebAuthenticatorBrowser>(), }) );Then check if it's working or not in MainPage.xaml.cs. Update OnLoginClicked method as below
private async void OnLoginClicked(object sender, EventArgs e)
{
    try
    {
        var loginResult = await OidcClient.LoginAsync(new LoginRequest());
        await DisplayAlert("Login Result", "Access Token is:\n\n" + loginResult.AccessToken, "Close");

        var refreshResult = await OidcClient.RefreshTokenAsync(loginResult.RefreshToken);
        await DisplayAlert("Refresh Result", "New Access Token is: \n\n" + refreshResult.AccessToken, "Close");
    }
    catch (Exception ex)
    {
        await DisplayAlert("Error", ex.ToString(), "ok");
    }
}
Storing the access token
In this step we have to store access token & refresh token for future requests.
Secure Storage is highly recommended to store this kind of sensitive data. But it's not topic of this article. You can configure and use SecureStorage on your own. I'll go with
App Properties.
Add following class to store key names instead of using magic strings in code.
namespace Acme.BookStore.MauiClient;

public static class OidcConsts
{
    internal const string AccessTokenKeyName = "__access_token";
    internal const string RefreshTokenKeyName = "__refresh_token";
}
Then go back to MainPage.xaml.cs and save our tokens after a successfull login.
private async void OnLoginClicked(object sender, EventArgs e)
{
    try
    {
        var loginResult = await OidcClient.LoginAsync(new LoginRequest());

        App.Current.Properties[OidcConsts.AccessTokenKeyName] = loginResult.AccessToken;
        App.Current.Properties[OidcConsts.RefreshTokenKeyName] = loginResult.RefreshToken;

        await App.Current.SavePropertiesAsync();

        // Navigate to an inner page here.
    }
    catch (Exception ex)
    {
        await DisplayAlert("Error", ex.ToString(), "ok");
    }
}
Add following AccessTokenHttpMessageHandler to append AccessToken to our requests & refresh token when required.
public class AccessTokenHttpMessageHandler : DelegatingHandler
{
    protected OidcClient OidcClient { get; }

    public AccessTokenHttpMessageHandler(OidcClient oidcClient) : base(new HttpClientHandler())
    {
        OidcClient = oidcClient;
    }

    protected override async Task<HttpResponseMessage> SendAsync(HttpRequestMessage request, CancellationToken cancellationToken)
    {
        if (App.Current.Properties.TryGetValue(OidcConsts.AccessTokenKeyName, out object currentTokenValue) && currentTokenValue != null)
        {
            request.SetBearerToken(currentTokenValue?.ToString());
            request.Headers.Accept.Add(new System.Net.Http.Headers.MediaTypeWithQualityHeaderValue("application/json"));
        }

        var response = await base.SendAsync(request, cancellationToken);

        if (response.StatusCode == System.Net.HttpStatusCode.Unauthorized)
        {
            if (App.Current.Properties.TryGetValue(OidcConsts.RefreshTokenKeyName, out object refreshTokenValue) && refreshTokenValue != null)
            {
                var refreshResult = await OidcClient.RefreshTokenAsync(refreshTokenValue?.ToString());

                App.Current.Properties[OidcConsts.AccessTokenKeyName] = refreshResult.AccessToken;
                App.Current.Properties[OidcConsts.RefreshTokenKeyName] = refreshResult.RefreshToken;
                await App.Current.SavePropertiesAsync();

                request.SetBearerToken(refreshResult.AccessToken);

                return await base.SendAsync(request, cancellationToken);
            }
            else
            {
                var result = await OidcClient.LoginAsync(new LoginRequest());
                request.SetBearerToken(result.AccessToken);

                App.Current.Properties[OidcConsts.AccessTokenKeyName] = result.AccessToken;
                App.Current.Properties[OidcConsts.RefreshTokenKeyName] = result.RefreshToken;
                await App.Current.SavePropertiesAsync();
                request.SetBearerToken(result.AccessToken);

                return await base.SendAsync(request, cancellationToken);
            }
        }

        return response;
    }
}
Then register to dependency injection.
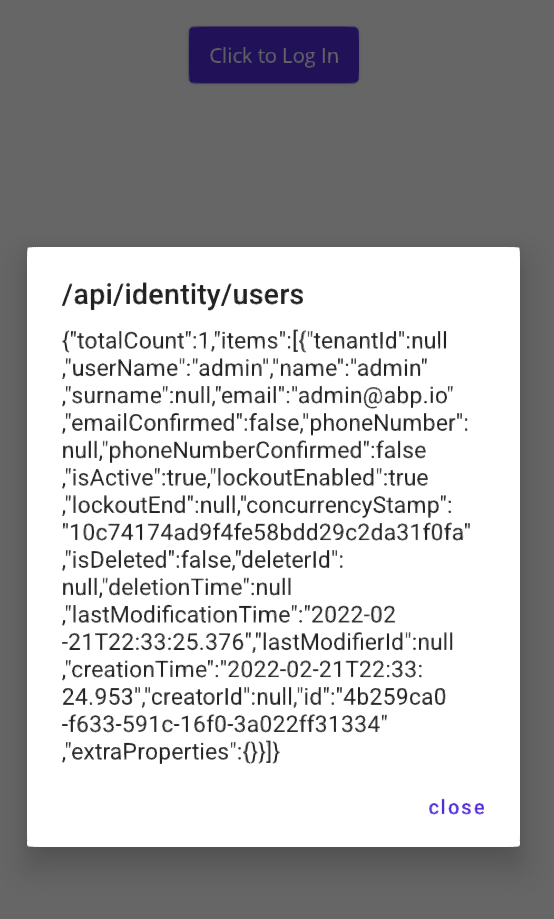
builder.Services.AddSingleton<AccessTokenHttpMessageHandler>();
builder.Services.AddTransient<HttpClient>(sp =>
    new HttpClient(sp.GetRequiredService<AccessTokenHttpMessageHandler>())
    {
        BaseAddress = new Uri("https://46fd-45-156-29-175.ngrok.io")
    });
Now make we can send request to backend with authentication. Go to MainPage.xaml.cs and send a request right after authentication.
private async void OnLoginClicked(object sender, EventArgs e)
{
    try
    {
        var loginResult = await OidcClient.LoginAsync(new LoginRequest());

        App.Current.Properties[OidcConsts.AccessTokenKeyName] = loginResult.AccessToken;
        App.Current.Properties[OidcConsts.RefreshTokenKeyName] = loginResult.RefreshToken;

        await App.Current.SavePropertiesAsync();

        var json = await httpClient.GetStringAsync("/api/identity/users");

        await DisplayAlert("/api/identity/users", json, "close");
    }
    catch (Exception ex)
    {
        await DisplayAlert("Error", ex.ToString(), "ok");
    }
}
Following result will be returned from API.
Recap
The purpose of this article is connecting to ABP backend with access token and it's working properly.
I'm planning to integrate HttpApi.Client library of backend project instead of making requests manually as a second part of this article. I'll get inspired by hikalkan/maui-abp-playing repo to achieve that.
alin.berce 63 weeks ago
@enisn great work, it's all nicely explain. However, most of the apps will require to have own login page, without leaving the app UI. What would be the recommended approach to perform login using the MAUI interface not a webview? Ideally would be an app service which gets injected in login page view mode and calls Login with email and password.