
ABP Framework consumed by .NET MAUI
In this article, I will show you how you can consume an ABP Framework application with a .NET Maui app.
The ABP Framework application has been developed with Blazor as UI framework and SQL Server as database provider.
Source Code
The source code of the ABP Framework and the .NET Maui application is available on GitHub.
Requirements
The following tools are needed to run the solution and follow along. You will also need to have Visual Studio 2022 Preview set up for .NET Maui development.
- .NET 6.0 SDK
- Visual Studio 2022 Preview
- Ngrok
Create ABP Framework application
- Install or update the ABP CLI:
dotnet tool install -g Volo.Abp.Cli || dotnet tool update -g Volo.Abp.Cli
- Use the following ABP CLI command to create a new Blazor ABP application:
abp new AbpMauiApi -u blazor -o AbpMauiApi
IdentityServer Settings
Add AbpMauiApi_Maui section in appsettings.json file of the AbpMauiApi.DbMigrator project
    // change the <replace-me-with-the-abp-api-port> with the port where the Swagger page is running on
    "AbpMauiApi_Maui": {
        "ClientId": "AbpMauiApi_Maui",
        "ClientSecret": "1q2w3e*",
        "RootUrl": "https://localhost:<replace-me-with-the-abp-api-port>/"
    }
Add Maui client IdentityServer configuration
In the CreateClientAsync method in class IdentityServerDataSeedContributor of the AbpMauiApi.Domain project.
    // Maui Client
    var MauiClientId = configurationSection["AbpMauiApi_Maui:ClientId"];
    if (!MauiClientId.IsNullOrWhiteSpace())
    {
        var MauiRootUrl = configurationSection["AbpMauiApi_Maui:RootUrl"].TrimEnd('/');
        await CreateClientAsync(
            name: MauiClientId,
            scopes: commonScopes,
            grantTypes: new[] { "authorization_code", "password" },
            secret: configurationSection["AbpMauiApi_Maui:ClientSecret"]?.Sha256(),
            requireClientSecret: false,
            redirectUri: "mauiclients:/authenticated",
            postLogoutRedirectUri: "mauiclients:/signout-callback-oidc",
            corsOrigins: new[] { MauiRootUrl.RemovePostFix("/") }
        );
    }
Apply Migrations and Run the Application
- Run the
AbpMauiApi.DbMigratorapplication to apply the migrations and seed the initial data. - Run the
AbpMauiApi.HttpApi.Hostapplication to start the API.
Ngrok to the rescue
When you are running the ABP Framework API on your local computer, the endpoints are reachable on https://localhost:<your-port-number>/api/<path>.
Although you can test out these endpoints on your local machine, it will fail in a .NET Maui application.
A .NET Maui app considers localhost as its own localhost address (mobile device or emulator) and not that of your computer.
To overcome this problem you can make use of ngrok. With ngrok you can mirror your localhost address to a publicly available url.
Download and install ngrok
Go to the ngrok page, create an account, and download and install Ngrok.
Run the Ngrok command
Open a command prompt and enter the command below to start ngrok
 // change the <replace-me-with-the-abp-api-port> with the port where the Swagger page is running on
ngrok.exe http -region eu https://localhost:<replace-with-the-abp-api-port-number>/
After running this command, you will receive the following output:
The API is now publicly available on https://f7db-2a02-810d-98c0-576c-647e-cd22-5b-e9a3.eu.ngrok.io
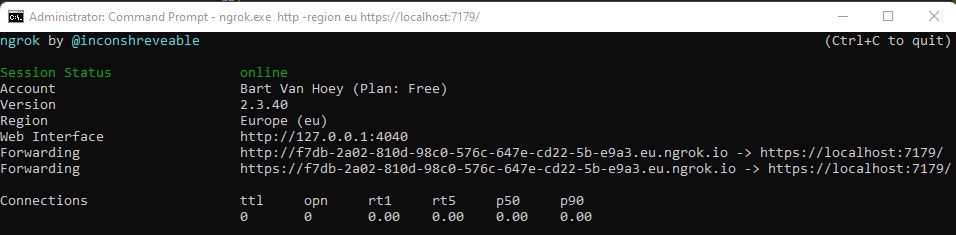
Copy the ngrok url
Copy the lower forwarding url as you will need it for use in the .NET MAUI app.
Create a .NET Maui app
Nuget packages
Open the Package Manager Console window and run the commands below:
    dotnet add package Refractored.MvvmHelpers --version 1.6.2
    dotnet add package System.IdentityModel.Tokens.Jwt --version 6.15.1
MainPage.xaml
Replace the content of the MainPage.xaml with the content below:
<ContentPage
  xmlns="http://schemas.microsoft.com/dotnet/2021/maui"
  xmlns:x="http://schemas.microsoft.com/winfx/2009/xaml"
  xmlns:local="clr-namespace:AbpMauiApp.ViewModels;assembly=AbpMauiApp"
  x:Class="AbpMauiApp.MainPage"
  BackgroundColor="{DynamicResource SecondaryColor}">

    <ContentPage.BindingContext>
        <local:MainViewModel />
    </ContentPage.BindingContext>

    <StackLayout Padding="10">
        <Label HorizontalOptions="Center"  Margin="5,15,5,15" Text="Hi, ABP Framework! Nice to meet you!" TextColor="#7b5fdf"  FontSize="18"
            FontAttributes="Bold"/>
        <Image Grid.Row="4"
                Source="dotnet_bot.png"
                SemanticProperties.Description="Cute dot net bot waving hi to you!"
                WidthRequest="250"
                HeightRequest="310"
                HorizontalOptions="Center" />

        <Entry Text="{Binding LoginUserName}" Placeholder="Enter user name..." />
        <Entry Text="{Binding LoginPassword}"  IsPassword="true" Placeholder="Enter password..." />
        <Button Text="Login"  FontAttributes="Bold" Command="{Binding LoginUserCommand}" HorizontalOptions="FillAndExpand" />
        <Label Margin="20" HorizontalOptions="Center"  Text="{Binding LoginUserMessage}" TextColor="Green"  FontSize="18"
            FontAttributes="Bold"/>
    </StackLayout>

</ContentPage>
MainViewModel.cs
Add a MainViewModel class in a ViewModels folder.
using AbpMauiApp.Services;
using MvvmHelpers;
using MvvmHelpers.Commands;
using System.Windows.Input;

namespace AbpMauiApp.ViewModels
{
    public class MainViewModel : BaseViewModel
    {
        private string _loginUserMessage, _loginUserName, _loginPassword;
        private AsyncCommand _loginUserCommand;

        public ICommand LoginUserCommand => _loginUserCommand ??=new AsyncCommand(LoginUserAsync);

        private async Task LoginUserAsync()
            => LoginUserMessage= await new IdentityService().LoginAsync(LoginUserName, LoginPassword);

        public string LoginUserMessage
        {
            get => _loginUserMessage;
            set => SetProperty(ref _loginUserMessage, value);
        }

        public string LoginUserName
        {
            get => _loginUserName;
            set => SetProperty(ref _loginUserName, value);
        }

        public string LoginPassword
        {
            get => _loginPassword;
            set => SetProperty(ref _loginPassword, value);
        }
    }
}
IdentityService.cs
Add an IdentityService class to a Services folder
using System.Text;
using System.Text.Json;

namespace AbpMauiApp.Services
{
    public class IdentityService
    {
        public async Task<string> LoginAsync(string userName, string password)
        {
            string clientId = "AbpMauiApi_Maui";
            string clientSecret = "1q2w3e*";
            string scope = "email openid profile role phone address AbpMauiApi"; ;
            string ngrokUrl = "<replace-me-with-the-ngrok-url>";

            var data = $"grant_type=password&username={userName}&password={password}&client_id={clientId}&client_secret={clientSecret}&scope={scope}";

            var content = new StringContent(data, Encoding.UTF8, "application/x-www-form-urlencoded");

            var httpClient = new HttpClient(GetHttpClientHandler());
            var response = await httpClient.PostAsync($"{ngrokUrl}/connect/token", content);
            response.EnsureSuccessStatusCode();

            var stringResult = await response.Content.ReadAsStringAsync();
            var loginResult = JsonSerializer.Deserialize<IdentityDto>(stringResult, Options);

            if (string.IsNullOrWhiteSpace(loginResult.access_token)) return "UnAuthorized";
            return "AccessToken received!";

        }

        private HttpClientHandler GetHttpClientHandler()
        {
            // EXCEPTION: Javax.Net.Ssl.SSLHandshakeException: 'java.security.cert.CertPathValidatorException:
            // Trust anchor for certification path not found.'
            // SOLUTION:
            // ATTENTION: DO NOT USE IN PRODUCTION

            var httpClientHandler = new HttpClientHandler
            {
                ServerCertificateCustomValidationCallback = (message, cert, chain, errors) => { return true; }
            };

            return httpClientHandler;
        }

        private JsonSerializerOptions Options => new()
        {
            WriteIndented = true,
            PropertyNameCaseInsensitive = true
        };

    }

    public class IdentityDto
    {
        public string access_token { get; set; }
        public int expires_in { get; set; }
        public string token_type { get; set; }
        public string scope { get; set; }
        public string error { get; set; }
        public string error_description { get; set; }
    }

}
Test the result
Run the HttpApi.Host project and make sure Ngrok is running too.
Start the .NET Maui app, enter the credentials (user name: admin - password: 1q2w3E*) and click the Login button.
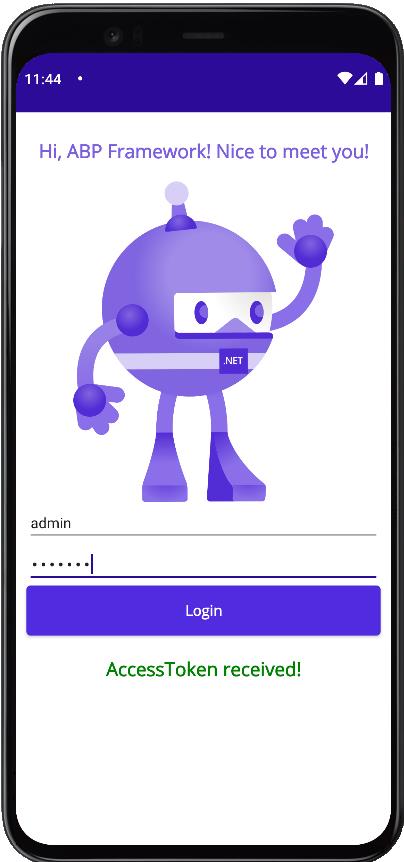
Et voilà! As you can see, you received an access token from the ABP Framework API. Now you can start consuming the API!
Get the source code on GitHub.
Enjoy and have fun!
Halil İbrahim Kalkan 114 weeks ago
Thanks for your post. I was also working on MAUI with ABP to explore it: https://github.com/hikalkan/maui-abp-playing I suppose creating a complete integration with MAUI + Blazor is possible and easier than I think.
Bart Van Hoey 114 weeks ago
Hello Halil, I looked at your maui-abp-playing repo and I was very impressed about the needless integration with the ABP Framework. I think the community would like to see more of it in a more advanced .NET MAUI application, and in an ABP Community Talk! Best regards, Bart
Alper Ebiçoğlu 103 weeks ago
Thank you for this contribution
aitlahmid 76 weeks ago
Thank you for providing us with this very useful solution. Is it possible to replace IdentityServer with OpenIddict. If yes, how?
Bart Van Hoey 76 weeks ago
https://github.com/bartvanhoey/MauiAbpOpenIddict
aitlahmid 76 weeks ago
Thank you very much Bart.
aitlahmid 75 weeks ago
Hi, Can you add, in the OpenIddict project, an example of consumption of the ABP API? Thanks.